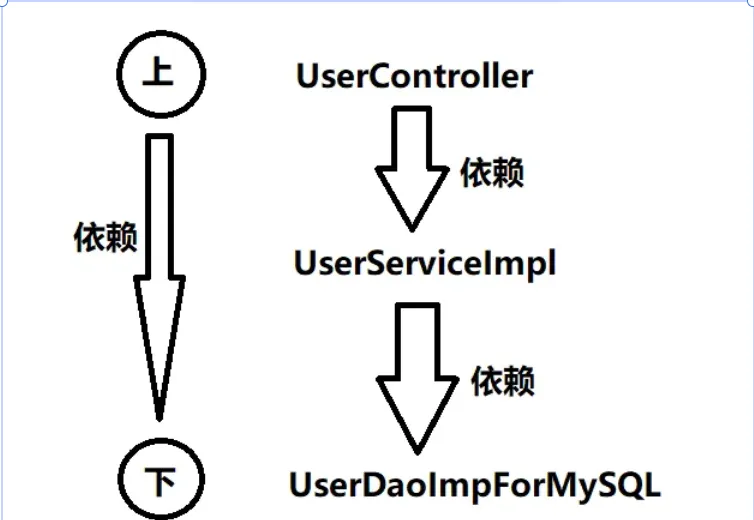
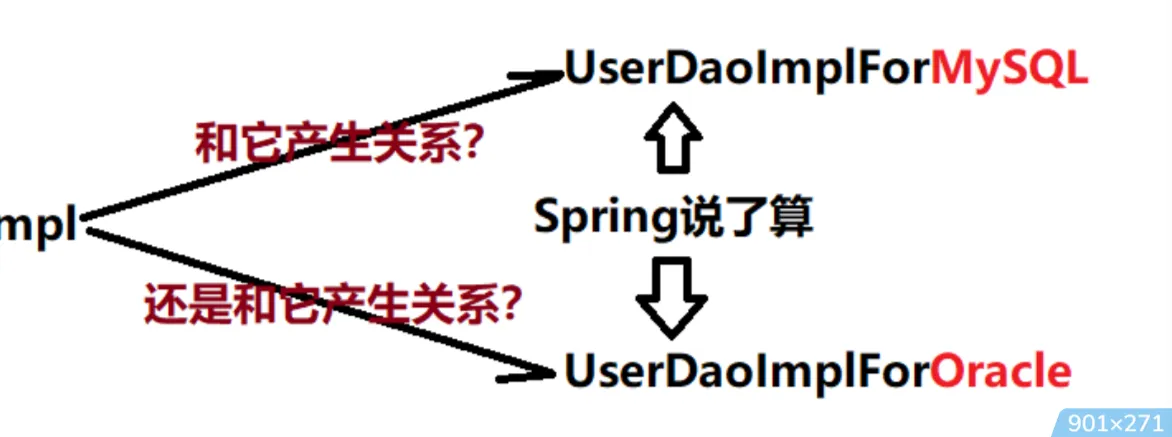
Spring启示录 OCP开闭原则 开闭原则规定对拓展开放,对修改关闭代码之间耦合度过高 在这个程序里上层依赖下层。UserController依赖UserServiceImpl,而UserServiceImpl依赖UserDaoImplForMySQL,这样就会导致下面只要改动,上面必然会受牵连(跟着也会改) ,所谓牵一发而动全身。这样也就同时违背了另一个开发原则:依赖倒置原则 依赖倒置原则 依赖倒置原则(Dependence Inversion Principle),简称DIP。主要倡导面向抽象编程,面向接口编程。(不直接手动new对象,由系统为属性分配对象) ,该原则包含两个关键点:高层模块不应该依赖低层模块,两者都应该依赖抽象 。此处抽象通常指接口或者抽象类抽象不应该依赖细节,细节(具体实现)应该依赖抽象 实现该原则的核心问题:谁来创建对象 谁来负责为新建的对象赋值 Spring框架为我们解决了这两个问题。 通过将对象的创建权/管理权交出去,不再使用硬编码的格式去操纵对象。像这种把对象的创建权和管理权交出去,被称为控制反转。 Ioc控制反转 控制反转(Inversion of Control,缩写为IOC)是一种更宽泛的设计模式或架构原则,能够用来降低代码代码之间的耦合度,符合依赖倒置原则。控制反转的核心是:将对象的创建权交出去,将对象和对象之间关系的管理权交出去,有第三方容器来负责创建与维护 目的:
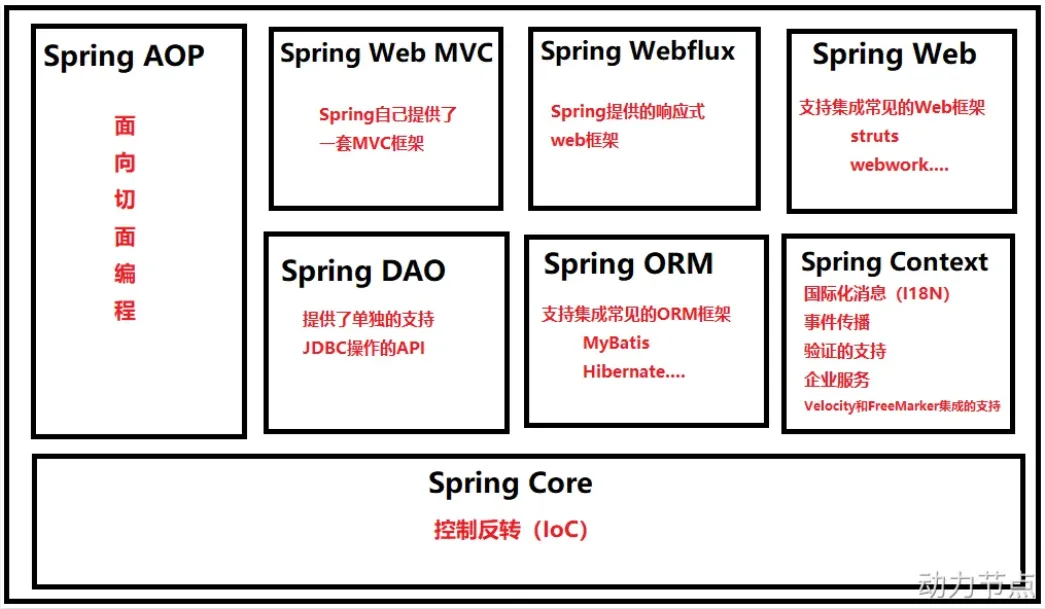
解耦组件: 组件不需要自己定位或创建依赖,只需要声明需要什么(如通过构造函数参数、setter 方法、字段标注)。容器负责满足这些依赖。集中管理配置和生命周期: 对象的创建、依赖关系、作用域(单例、原型等)可以在一个地方(如 XML、注解、Java Config)集中配置和管理。提高可测试性: 依赖可以更容易地被 Mock 或 Stub 替换进行单元测试。促进模块化和可重用性: 组件更专注于自身业务逻辑,不涉及复杂的依赖管理代码。为 AOP 等高级特性提供基础: IoC 容器是实现面向切面编程(AOP)的常见基础。控制反转常见的实现方式:依赖注入 通常依赖注入的方式有两种: Spring概述 Spirng Context模块 如果说核心模块中的BeanFactory使Spirng成为容器,那么上下文模块就是Spring成为框架的原因
此模块拓展类BeanFactory,增加了对国际化(I18N)消息、事件传播、验证的支持。另外提供了许多企业服务,例如电子邮件、JNDI访问、EJB集成、远程以及时序调度(scheduling)服务。也包括了对模版框架例如Velocity和FreeMarker集成的支持
Spring AOP模块 Spring在它的AOP模块中提供了对面向切面编程的丰富支持,Spring AOP 模块为基于 Spring 的应用程序中的对象提供了事务管理服务。通过使用 Spring AOP,不用依赖组件,就可以将声明性事务管理集成到应用程序中,可以自定义拦截器、切点、日志等操作。
Spring DAO模块 提供了一个JDBC的抽象层和异常层次结构,消除了烦琐的JDBC编码和数据库厂商特有的错误代码解析,用于简化JDBC。
Spring ORM模块 Spring提供了ORM模块。Spring并不试图实现它自己的ORM解决方案,而是为几种流行的ORM框架提供了集成方案,包括Hibernate、JDO和iBATIS SQL映射,这些都遵从 Spring 的通用事务和 DAO 异常层次结构。
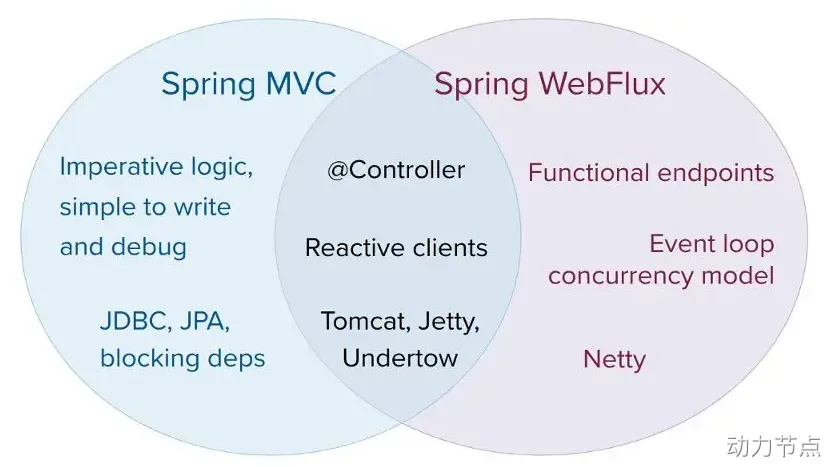
Spring web MVC模块 Spring为构建Web应用提供了一个功能全面的MVC框架。虽然Spring可以很容易地与其它MVC框架集成,例如Struts,但Spring的MVC框架使用IoC对控制逻辑和业务对象提供了完全的分离。
Spring webFlux模块 Spring Framework 中包含的原始 Web 框架 Spring Web MVC 是专门为 Servlet API 和 Servlet 容器构建的。反应式堆栈 Web 框架 Spring WebFlux 是在 5.0 版的后期添加的。它是完全非阻塞的,支持反应式流(Reactive Stream)背压,并在Netty,Undertow和Servlet 3.1+容器等服务器上运行。
Spring web模块 Web 上下文模块建立在应用程序上下文模块之上,为基于 Web 的应用程序提供了上下文,提供了Spring和其它Web框架的集成,比如Struts、WebWork。还提供了一些面向服务支持,例如:实现文件上传的multipart请求。
Spring的特点 轻量级 从大小与开销两方面而言Spring都是轻量的。完整的Spring框架可以在一个大小只有1MB多的JAR文件里发布。并且Spring所需的处理开销也是微不足道的。 Spring是非侵入式的:Spring应用中的对象不依赖于Spring的特定类。 控制反转 Spring通过一种称作控制反转(IoC)的技术促进了松耦合。当应用了IoC,一个对象依赖的其它对象会通过被动的方式传递进来,而不是这个对象自己创建或者查找依赖对象。你可以认为IoC与JNDI相反——不是对象从容器中查找依赖,而是容器在对象初始化时不等对象请求就主动将依赖传递给它。 面向切面 Spring提供了面向切面编程的丰富支持,允许通过分离应用的业务逻辑与系统级服务(例如审计(auditing)和事务(transaction)管理)进行内聚性的开发。应用对象只实现它们应该做的——完成业务逻辑——仅此而已。它们并不负责(甚至是意识)其它的系统级关注点,例如日志或事务支持。 容器 Spring包含并管理应用对象的配置和生命周期,在这个意义上它是一种容器,你可以配置你的每个bean如何被创建——基于一个可配置原型(prototype),你的bean可以创建一个单独的实例或者每次需要时都生成一个新的实例——以及它们是如何相互关联的。然而,Spring不应该被混同于传统的重量级的EJB容器,它们经常是庞大与笨重的,难以使用。 框架 Spring可以将简单的组件配置、组合成为复杂的应用。在Spring中,应用对象被声明式地组合,典型地是在一个XML文件里。Spring也提供了很多基础功能(事务管理、持久化框架集成等等),将应用逻辑的开发留给了你。 Spring的这些特征能使编写更干净、更可管理、并且更易于测试的代码。它们也为Spring中的各种模块提供了基础支持。
Spring 入门程序 引入依赖 Spring有各种Jar包,来满足不同需求,仅仅使用Spring的IOC功能,只需要引入spring-context这个Jar包即可 1 2 3 4 5 <dependency > <groupId > org.springframework</groupId > <artifactId > spring-context</artifactId > <version > 6.1.14</version > </dependency >
当引入Spring-Context包之后,还会关联引入一些其他的依赖:
spring aop: 面向切面编程spring beans: IoC核心spring core: spring的核心工具包spring jcl: spring的日志包spring expression: spring表达式
定义bean:User 1 2 3 4 5 package com.powernode.spring6.bean;public class User {}
编写Spring的配置文件 创建一个Spring的配置文件,命名为beans.xml,来统一管理Bean,该文件放在类的根路径下 1 2 3 4 5 6 7 8 9 10 11 12 13 14 15 16 17 18 19 <?xml version="1.0" encoding="UTF-8" ?> <beans xmlns ="http://www.springframework.org/schema/beans" xmlns:xsi ="http://www.w3.org/2001/XMLSchema-instance" xsi:schemaLocation ="http://www.springframework.org/schema/beans http://www.springframework.org/schema/beans/spring-beans.xsd" > <bean id ="userBean" class ="com.powernode.spring6.bean.User" /> </beans >
编写测试程序 1 2 3 4 5 6 7 8 9 10 11 12 13 14 15 16 17 18 19 20 21 22 23 package com.powernode.spring6.test;import org.junit.Test;import org.springframework.context.ApplicationContext;import org.springframework.context.support.ClassPathXmlApplicationContext;public class Spring6Test {@Test public void testFirst () {ApplicationContext applicationContext = new ClassPathXmlApplicationContext ("beans.xml" );Object userBean = applicationContext.getBean("userBean" );System.out.println(userBean); } }
需要注意的问题:spring的配置文件中id不能重复 Spirng底层是通过反射机制调用无参数的构造方法,因此想让spring创建对象,必须保证无参数构造方法存在 配置文件的名称不固定,需要我们在创建类之前手动提供配置文件 beans.xml这样的配置文件可以有多个,初始化Spring之前指定好即可 Spring配置文件配置的bean既可以是JDK中的类,也可以是自定义的,只要这个类不是抽象的,且提供了无参构造方法即可 直接getBean()方法返回的类型是Object类,如果想直接返回指定类,则需要添加类的Class类型作为第二个参数 1 User user = applicationContext.getBean("userBean" , User.class);
使用Bean工厂获得Bean BeanFactory是Application的超级父接口,也可以用来加载Bean
1 2 3 BeanFactory beanFactory = new ClassPathXmlApplicationContext ("spring.xml" );Object vipBean = beanFactory.getBean("vipBean" );System.out.println(vipBean);
启用Log4j2日志框架 1 2 3 4 5 6 7 8 9 10 11 <dependency > <groupId > org.apache.logging.log4j</groupId > <artifactId > log4j-core</artifactId > <version > 2.19.0</version > </dependency > <dependency > <groupId > org.apache.logging.log4j</groupId > <artifactId > log4j-slf4j2-impl</artifactId > <version > 2.19.0</version > </dependency >
然后在类的根路径提供一个log4j2.xml的配置文件(文件名固定,且必须放到类的根路径下) 1 2 3 4 5 6 7 8 9 10 11 12 13 14 15 16 17 18 19 20 21 22 23 <?xml version="1.0" encoding="UTF-8" ?> <configuration > <loggers > <root level ="DEBUG" > <appender-ref ref ="spring6log" /> </root > </loggers > <appenders > <console name ="spring6log" target ="SYSTEM_OUT" > <PatternLayout pattern ="%d{yyyy-MM-dd HH:mm:ss SSS} [%t] %-3level %logger{1024} - %msg%n" /> </console > </appenders > </configuration >
1 2 3 4 5 6 7 8 9 10 11 12 13 14 15 16 17 18 19 public class Spring6Test {@Test public void testFirst () {ApplicationContext applicationContext = new ClassPathXmlApplicationContext ("beans.xml" );Object userBean = applicationContext.getBean("userBean" );System.out.println(userBean); Logger logger = LoggerFactory.getLogger(Spring6Test.class);logger.info("我是一条日志消息" ); logger.debug("我是一条调试消息" ); logger.error("我是一条错误消息" ); } }
Spring对IoC的实现 IoC控制反转 Ioc控制反转是一种设计思想,而依赖注入是IoC思想的具体实现。 IoC控制反转的作用:降低程序耦合度,提高程序扩展力,达到OCP原则的实现。 Ioc控制反转中,反转的是什么?反转的是对象间依赖关系的控制权。 将对象的创建权利和对象间关系的维护权交出去,交给第三方容器负责 依赖注入 Spring通过依赖注入来完成Bean的管理 两种注入方式: Bean管理: Bean对象的创建,以及Bean对象中属性的赋值(Bean对象间关系的维护) Set注入 Set注入是基于Set方法实现的,故需提供对应的Set方法,且Set方法应符合标准命名规范,底层会通过反射来调用Set方法给属性赋值 1 2 3 4 5 6 7 8 9 10 11 12 <?xml version="1.0" encoding="UTF-8" ?> <beans xmlns ="http://www.springframework.org/schema/beans" xmlns:xsi ="http://www.w3.org/2001/XMLSchema-instance" xsi:schemaLocation ="http://www.springframework.org/schema/beans http://www.springframework.org/schema/beans/spring-beans.xsd" > <bean id ="userDaoBean" class ="com.powernode.spring6.dao.UserDao" /> <bean id ="userServiceBean" class ="com.powernode.spring6.service.UserService" > <property name ="userDao" ref ="userDaoBean" /> </bean > </beans >
实现原理: 通过Property标签来获得属性名,ref属性来获得注入的属性类型(通过ref属性来完成bean的装配,这是bean最简单的一种装配方式。装配指的是:创建系统组件之间关联的动作) 通过属性名来推断出Set方法名(故Set方法应遵循标准命名规范) 利用反射机制调用相关Set方法来给属性赋值 构造注入 核心原理:调用构造方法为属性赋值 1 2 3 4 5 <bean id ="orderDaoBean" class ="com.powernode.spring6.dao.OrderDao" /> <bean id ="orderServiceBean" class ="com.powernode.spring6.service.OrderService" > <constructor-arg index ="0" ref ="orderDaoBean" /> </bean >
1 2 3 4 5 6 7 8 9 10 11 12 public class OrderService {private OrderDao orderDao;public OrderService (OrderDao orderDao) {this .orderDao = orderDao;} public void delete () {orderDao.deleteById(); } }
1 2 3 4 5 6 7 8 9 10 11 12 13 14 15 public class OrderService {private OrderDao orderDao;private UserDao userDao;public OrderService (OrderDao orderDao, UserDao userDao) {this .orderDao = orderDao;this .userDao = userDao;} public void delete () {orderDao.deleteById(); userDao.insert(); } }
1 2 3 4 5 6 7 8 9 10 <bean id ="orderDaoBean" class ="com.powernode.spring6.dao.OrderDao" /> <bean id ="orderServiceBean" class ="com.powernode.spring6.service.OrderService" > <constructor-arg index ="0" ref ="orderDaoBean" /> <constructor-arg index ="1" ref ="userDaoBean" /> </bean > <bean id ="userDaoBean" class ="com.powernode.spring6.dao.UserDao" />
也可以不使用参数的下标,直接使用参数的名字实现构造注入,建议最好顺序不要乱,这样会更清晰 1 2 3 4 5 6 7 8 <bean id ="orderDaoBean" class ="com.powernode.spring6.dao.OrderDao" /> <bean id ="orderServiceBean" class ="com.powernode.spring6.service.OrderService" > <constructor-arg ref ="orderDaoBean" /> <constructor-arg ref ="userDaoBean" /> </bean > <bean id ="userDaoBean" class ="com.powernode.spring6.dao.UserDao" />
构造注入:可以通过下标来指定参数的位置 可以通过参数名字来指定参数的位置 也可以不指定下标和参数名,根据类型自动推断 Set注入专题 注入外部Bean 前面演示的Set注入就是注入外部Bean的方式 注入外部Bean的特点:Bean定义在外面,直接使用ref标签注入即可 1 2 3 4 5 6 7 8 9 10 11 12 <?xml version="1.0" encoding="UTF-8" ?> <beans xmlns ="http://www.springframework.org/schema/beans" xmlns:xsi ="http://www.w3.org/2001/XMLSchema-instance" xsi:schemaLocation ="http://www.springframework.org/schema/beans http://www.springframework.org/schema/beans/spring-beans.xsd" > <bean id ="userDaoBean" class ="com.powernode.spring6.dao.UserDao" /> <bean id ="userServiceBean" class ="com.powernode.spring6.service.UserService" > <property name ="userDao" ref ="userDaoBean" /> </bean > </beans >
注入内部Bean 注入内部Bean的特点:Bean定义在里面,需要在Bean标签中嵌套Bean标签,用的较少 1 2 3 4 5 6 7 8 9 10 11 12 13 14 <?xml version="1.0" encoding="UTF-8" ?> <beans xmlns ="http://www.springframework.org/schema/beans" xmlns:xsi ="http://www.w3.org/2001/XMLSchema-instance" xsi:schemaLocation ="http://www.springframework.org/schema/beans http://www.springframework.org/schema/beans/spring-beans.xsd" > <bean id ="userServiceBean" class ="com.powernode.spring6.service.UserService" > <property name ="userDao" > <bean class ="com.powernode.spring6.dao.UserDao" /> </property > </bean > </beans >
注入简单类型 简单类型包括:基本数据类型 基本数据类型的包装型 String和Class Number子类 Date可以通过PropertyEditor 或 Converter 将字符串转换为日期类型 Enum子类 URL等扩展类型均可以 注入简单类型的特点:直接使用value标签注入即可 1 <property name ="file" value ="classpath:config.properties" />
级联属性赋值(了解) 级联属性赋值:在Spring的Set注入中,集合中存放的是对象类型,可以直接在集合定义时为内部对象的属性赋值,简单来说就是可以在Set中给对象的私有属性赋值,而不需要单独创建对象再Set 要点:必须注意配置顺序正确 在Spring的配置文件中,clazz属性必须提供Getter方法,因为在复制过程中,Spring需要通过Getter方法获取clazz,再为clazz的属性赋值 1 2 3 4 5 6 7 8 9 10 11 @Data public class Clazz {private String name;public Clazz () {} public Clazz (String name) {this .name = name;} }
1 2 3 4 5 6 7 8 9 10 11 12 13 @Data public class Student {private String name;private Clazz clazz;public Student () {} public Student (String name, Clazz clazz) {this .name = name;this .clazz = clazz;} }
1 2 3 4 5 6 7 8 9 10 11 12 13 14 15 16 <?xml version="1.0" encoding="UTF-8" ?> <beans xmlns ="http://www.springframework.org/schema/beans" xmlns:xsi ="http://www.w3.org/2001/XMLSchema-instance" xsi:schemaLocation ="http://www.springframework.org/schema/beans http://www.springframework.org/schema/beans/spring-beans.xsd" > <bean id ="clazzBean" class ="com.powernode.spring6.beans.Clazz" /> <bean id ="student" class ="com.powernode.spring6.beans.Student" > <property name ="name" value ="张三" /> <property name ="clazz" ref ="clazzBean" /> <property name ="clazz.name" value ="高三一班" /> </bean > </beans >
注入数组 1 2 3 4 5 6 7 8 9 10 11 12 13 14 15 <?xml version="1.0" encoding="UTF-8" ?> <beans xmlns ="http://www.springframework.org/schema/beans" xmlns:xsi ="http://www.w3.org/2001/XMLSchema-instance" xsi:schemaLocation ="http://www.springframework.org/schema/beans http://www.springframework.org/schema/beans/spring-beans.xsd" > <bean id ="person" class ="com.powernode.spring6.beans.Person" > <property name ="favariteFoods" > <array > <value > 鸡排</value > <value > 汉堡</value > <value > 鹅肝</value > </array > </property > </bean > </beans >
当数组中的元素是非简单类型时,需要使用array标签的ref元素来引用其他Bean1 2 3 4 5 6 7 8 9 10 11 @Data public class Goods {private String name;public Goods () {} public Goods (String name) {this .name = name;} }
1 2 3 4 5 6 7 8 9 10 11 @Data public class Order {private Goods[] goods;public Order () {} public Order (Goods[] goods) {this .goods = goods;} }
1 2 3 4 5 6 7 8 9 10 11 12 13 14 15 16 17 18 19 20 21 22 23 24 25 <?xml version="1.0" encoding="UTF-8" ?> <beans xmlns ="http://www.springframework.org/schema/beans" xmlns:xsi ="http://www.w3.org/2001/XMLSchema-instance" xsi:schemaLocation ="http://www.springframework.org/schema/beans http://www.springframework.org/schema/beans/spring-beans.xsd" > //分别创建两个bean代表不同种类的水果 <bean id ="goods1" class ="com.powernode.spring6.beans.Goods" > <property name ="name" value ="西瓜" /> </bean > <bean id ="goods2" class ="com.powernode.spring6.beans.Goods" > <property name ="name" value ="苹果" /> </bean > <bean id ="order" class ="com.powernode.spring6.beans.Order" > <property name ="goods" > <array > <ref bean ="goods1" /> <ref bean ="goods2" /> </array > </property > </bean > </beans >
要点:
数组是简单类型,使用value标签 数组是飞简单类型,使用ref标签 注入List集合 与注入数组类似,使用List标签即可,如果是简单类型,使用value标签,如果是非简单类型,使用ref标签 1 2 3 4 5 @Data public class People {private List<String> names;}
1 2 3 4 5 6 7 8 9 10 11 12 13 14 15 16 17 <?xml version="1.0" encoding="UTF-8" ?> <beans xmlns ="http://www.springframework.org/schema/beans" xmlns:xsi ="http://www.w3.org/2001/XMLSchema-instance" xsi:schemaLocation ="http://www.springframework.org/schema/beans http://www.springframework.org/schema/beans/spring-beans.xsd" > <bean id ="peopleBean" class ="com.powernode.spring6.beans.People" > <property name ="names" > <list > <value > 铁锤</value > <value > 张三</value > <value > 张三</value > <value > 张三</value > <value > 狼</value > </list > </property > </bean > </beans >
注入Set集合 与注入其他类型一致,使用标签,简单类型使用value,非简单类型可以使用ref 1 2 3 4 5 @Data public class People { private Set<String> phones; }
1 2 3 4 5 6 7 8 9 10 11 12 13 14 15 16 17 18 19 <?xml version="1.0" encoding="UTF-8" ?> <beans xmlns ="http://www.springframework.org/schema/beans" xmlns:xsi ="http://www.w3.org/2001/XMLSchema-instance" xsi:schemaLocation ="http://www.springframework.org/schema/beans http://www.springframework.org/schema/beans/spring-beans.xsd" > <bean id ="peopleBean" class ="com.powernode.spring6.beans.People" > <property name ="phones" > <set > <value > 110</value > <value > 110</value > <value > 120</value > <value > 120</value > <value > 119</value > <value > 119</value > </set > </property > </bean > </beans >
注入Map集合 要点:
使用标签 如果key是简单类型,使用 key 属性,反之使用 key-ref 属性。 如果value是简单类型,使用 value 属性,反之使用 value-ref 属性。 1 2 3 4 5 @Data public class People { private Map<Integer, String> addrs; }
1 2 3 4 5 6 7 8 9 10 11 12 13 14 15 16 17 <?xml version="1.0" encoding="UTF-8" ?> <beans xmlns ="http://www.springframework.org/schema/beans" xmlns:xsi ="http://www.w3.org/2001/XMLSchema-instance" xsi:schemaLocation ="http://www.springframework.org/schema/beans http://www.springframework.org/schema/beans/spring-beans.xsd" > <bean id ="peopleBean" class ="com.powernode.spring6.beans.People" > <property name ="addrs" > <map > <entry key ="1" value ="北京大兴区" /> <entry key ="2" value ="上海浦东区" /> <entry key ="3" value ="深圳宝安区" /> </map > </property > </bean > </beans >
注入Properties java.util.Properties继承java.util.Hashtable,所以Properties本质上也是一个Map集合,故注入方式类似 要点:
使用标签 如果key是简单类型,使用 key 属性,反之使用 key-ref 属性。 如果value是简单类型,使用 value 属性,反之使用 value-ref 属性。 1 2 3 4 @Data public class People { private Properties properties; }
注入null和空字符串 注入空字符串使用:或者 value=”” 注入null使用:或者 不为该属性赋值 1 2 3 4 5 6 7 8 9 10 11 12 13 14 15 <?xml version="1.0" encoding="UTF-8" ?> <beans xmlns ="http://www.springframework.org/schema/beans" xmlns:xsi ="http://www.w3.org/2001/XMLSchema-instance" xsi:schemaLocation ="http://www.springframework.org/schema/beans http://www.springframework.org/schema/beans/spring-beans.xsd" > <bean id ="vipBean" class ="com.powernode.spring6.beans.Vip" > <property name ="email" > <value /> </property > </bean > </beans >
1 2 3 4 5 6 7 8 9 10 11 12 13 <?xml version="1.0" encoding="UTF-8" ?> <beans xmlns ="http://www.springframework.org/schema/beans" xmlns:xsi ="http://www.w3.org/2001/XMLSchema-instance" xsi:schemaLocation ="http://www.springframework.org/schema/beans http://www.springframework.org/schema/beans/spring-beans.xsd" > //注入Null的第一种 <bean id ="vipBean" class ="com.powernode.spring6.beans.Vip" /> //注入Null的第二种 <bean id ="vipBean" class ="com.powernode.spring6.beans.Vip" > <property name ="email" > <null /> </property > </bean > </beans >
注入的值含义特殊符号 XML中有5个特殊字符,分别是:<、>、’、”、& 以上5个特殊符号在XML中会被特殊对待,会被当做XML语法的一部分进行解析,如果这些特殊符号直接出现在注入的字符串当中就会报错。 解决方案包括两种:
第一种:特殊符号使用转义字符代替。 第二种:将含有特殊符号的字符串放到:<![CDATA[]]> 当中。因为放在CDATA区中的数据不会被XML文件解析器解析。 5个特殊字符对应的转义字符分别是:
1 2 3 4 5 6 7 8 <?xml version="1.0" encoding="UTF-8" ?> <beans xmlns ="http://www.springframework.org/schema/beans" xmlns:xsi ="http://www.w3.org/2001/XMLSchema-instance" xsi:schemaLocation ="http://www.springframework.org/schema/beans http://www.springframework.org/schema/beans/spring-beans.xsd" > <bean id ="mathBean" class ="com.powernode.spring6.beans.Math" > <property name ="result" value ="2 < 3" /> </bean > </beans >
1 2 3 4 5 6 7 8 9 10 11 12 13 <?xml version="1.0" encoding="UTF-8" ?> <beans xmlns ="http://www.springframework.org/schema/beans" xmlns:xsi ="http://www.w3.org/2001/XMLSchema-instance" xsi:schemaLocation ="http://www.springframework.org/schema/beans http://www.springframework.org/schema/beans/spring-beans.xsd" > <bean id ="mathBean" class ="com.powernode.spring6.beans.Math" > <property name ="result" > <value > <![CDATA[2 < 3]]></value > </property > </bean > </beans >
P命名空间注入 目的:简化Set注入。 前提条件:在XML文件中引入P命名空间:xmlns:p="http://www.springframework.org/schema/p" P命名空间是基于Setter方法的,所以需要对应属性提供Setter方法 1 2 3 4 5 6 7 8 9 10 11 12 13 14 package com.powernode.spring6.beans;@Data public class Customer { private String name; private int age; public void setName (String name) { this .name = name; } public void setAge (int age) { this .age = age; } }
1 2 3 4 5 6 7 8 9 <?xml version="1.0" encoding="UTF-8" ?> <beans xmlns ="http://www.springframework.org/schema/beans" xmlns:p ="http://www.springframework.org/schema/p" xmlns:xsi ="http://www.w3.org/2001/XMLSchema-instance" xsi:schemaLocation ="http://www.springframework.org/schema/beans http://www.springframework.org/schema/beans/spring-beans.xsd" > <bean id ="customerBean" class ="com.powernode.spring6.beans.Customer" p:name ="zhangsan" p:age ="20" /> </beans >
C命名空间注入 目的:简化构造注入。 前提条件:在XML文件中引入C命名空间:xmlns:c="http://www.springframework.org/schema/c" C命名空间是基于构造方法的,所以需要对应属性提供构造方法 1 2 3 4 5 6 7 8 9 10 11 12 13 package com.powernode.spring6.beans;@Data public class MyTime { private int year; private int month; private int day; public MyTime (int year, int month, int day) { this .year = year; this .month = month; this .day = day; } }
1 2 3 4 5 6 7 8 9 10 11 <?xml version="1.0" encoding="UTF-8" ?> <beans xmlns ="http://www.springframework.org/schema/beans" xmlns:c ="http://www.springframework.org/schema/c" xmlns:xsi ="http://www.w3.org/2001/XMLSchema-instance" xsi:schemaLocation ="http://www.springframework.org/schema/beans http://www.springframework.org/schema/beans/spring-beans.xsd" > <bean id ="myTimeBean" class ="com.powernode.spring6.beans.MyTime" c:_0 ="2008" c:_1 ="8" c:_2 ="8" /> </beans >
不管是p命名空间还是c命名空间,注入的时候都可以注入简单类型以及非简单类型。
Util命名空间 目的:让配置复用 前提条件:在XML文件中引入Util命名空间:xmlns:util="http://www.springframework.org/schema/util" 1 2 3 4 5 6 7 8 9 10 11 12 13 14 15 16 17 18 19 20 21 22 <?xml version="1.0" encoding="UTF-8" ?> <beans xmlns ="http://www.springframework.org/schema/beans" xmlns:xsi ="http://www.w3.org/2001/XMLSchema-instance" xmlns:util ="http://www.springframework.org/schema/util" xsi:schemaLocation ="http://www.springframework.org/schema/beans http://www.springframework.org/schema/beans/spring-beans.xsd http://www.springframework.org/schema/util http://www.springframework.org/schema/util/spring-util.xsd" > <util:properties id ="prop" > <prop key ="driver" > com.mysql.cj.jdbc.Driver</prop > <prop key ="url" > jdbc:mysql://localhost:3306/spring</prop > <prop key ="username" > root</prop > <prop key ="password" > 123456</prop > </util:properties > <bean id ="dataSource1" class ="com.powernode.spring6.beans.MyDataSource1" > <property name ="properties" ref ="prop" /> </bean > <bean id ="dataSource2" class ="com.powernode.spring6.beans.MyDataSource2" > <property name ="properties" ref ="prop" /> </bean > </beans >
基于XML的自动装配 Spring的自动化注入又被称为自动装配,能根据名字进行自动装配,也可根据类型进行自动装配。 无论是通过名字还是类型进行自动装配,都是基于Set方法进行自动装配的,所以Set方法必须提供。(不考虑使用注解) 基于名字进行自动装配 底层调用Set方法进行注入。主要是根据属性名称所对应的Set方法与Bean的ID之间的关联进行自动装配 1 2 3 4 5 6 public class UserDao { public void insert () { System.out.println("正在保存用户数据。" ); } }
1 2 3 4 5 6 7 8 9 10 11 public class UserService { private UserDao aaa; public void setAaa (UserDao aaa) { this .aaa = aaa; } public void save () { aaa.insert(); } }
1 2 3 4 5 6 7 8 9 10 <?xml version="1.0" encoding="UTF-8" ?> <beans xmlns ="http://www.springframework.org/schema/beans" xmlns:xsi ="http://www.w3.org/2001/XMLSchema-instance" xsi:schemaLocation ="http://www.springframework.org/schema/beans http://www.springframework.org/schema/beans/spring-beans.xsd" > <bean id ="userService" class ="com.powernode.spring6.service.UserService" autowire ="byName" /> <bean id ="aaa" class ="com.powernode.spring6.dao.UserDao" /> </beans >
配置文件中的autowire=”byName”起到关键作用,表示通过名称进行自动装配 UserService类中有一个UserDao属性,而UserDao属性的名字是aaa,对应的set方法是setAaa(),正好和UserDao Bean的id是一样的。这就是根据名称自动装配。 基于类型进行自动装配